Little did I know
Since remodelling the Dwarf, I've spent the last 2 days tweaking my slicer and print settings to get him to print accurately, but to no avail. Not only am I finding Cura 2.3's support structure somewhat difficult to remove, it is often placing supports where they are not needed, causing the entire model to look rather rough. In the mean time, I've also been experimenting with new layer heights, based on an article detailing optimal heights for the Monoprice Select Mini,
found here in the wiki.
Don't get me wrong, I'm very pleased with the results so far, but something just didn't seem right; the more I learn about 3D printing, the better quality I'm beginning to expect.
So, with all the trouble I was having, I decided to take the plunge and spend an additional (very steep price of) $150.00 USD on Simplify3D (S3D), one of the most talked about slicers in the industry. Thankfully, if i'm not entirely satisfied within two weeks, I will be pleased to accept a full refund.
First I will say, the supports that are generated are (although not always entirely accurate), absolutely stunning and easily removable - you also have the ability to add your own supports, and remove those that you don't require, which is incredible. Scaling my object on the other hand turned out to be a pain, having to miniaturize the actual blender file prior to exporting it to STL - and even after all that was said and done, my print still had issues! But not just a little bit of stringing and looking rough, the model was left with entire sections missing, holes where there shouldn't be et cetera...
So, I did some additional research and what I discovered was almost too much for me to handle..
Modeling for 3D printing
Oh yes, I've been doing it all wrong! I figured there would be certain ways to optimise meshes for 3D printing, but it turns out that having multiple objects / meshes in blender and to export these as one STL with multiple intersections is not the proper way to do this; sure this might work for gaming or rendering. If that is the case, the slicer is constantly fighting with the edges, cutting and having to heal non-manifold edges (holes in the model), which makes for relatively poor resulting gcode which is often times way more complex than it needs to be.
Note: Ctrl+Shift+Alt+M in edit mode of blender displays all non-manifold edges of a mesh.
But why wasn't this an issue before? Wouldn't this imply that Slic3r and Cura are doing a much better job slicing these models than S3D? Are the wicked supports really worth $150.00 USD of my hard earned Canadian moola? Well, yes and no. From what I gather, the gcode that is generated by S3D is incredibly efficient and puts out very smooth and beautifully finished pieces, when it works. I suspect that both Slic3r and Cura are cheating, skipping entire sections of mesh, and only sometimes leaving small gaps (which I've noticed in the past but attributed to poor plastic extrusion). So, with this in mind, I've set out on fixing the 3 models I've created so far to create a single seamless Mesh.
The single, seamless Mesh
So, how is this done? Manually of course, by joining multiple objects together and adding / merging vertices at the edge of each of the pieces...but not only would that be tedious, it would actually be impractical, and nearly impossible for the following reason: the number of subdivisions in each of the parts is extremely high to produce a very smooth surface - so having to create faces between each of the edges, for every single object (not mesh in this case) could take up to tens of hours per finished model.
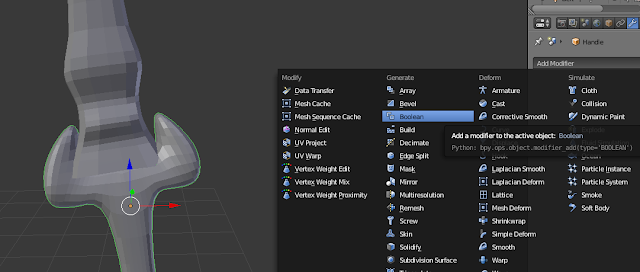
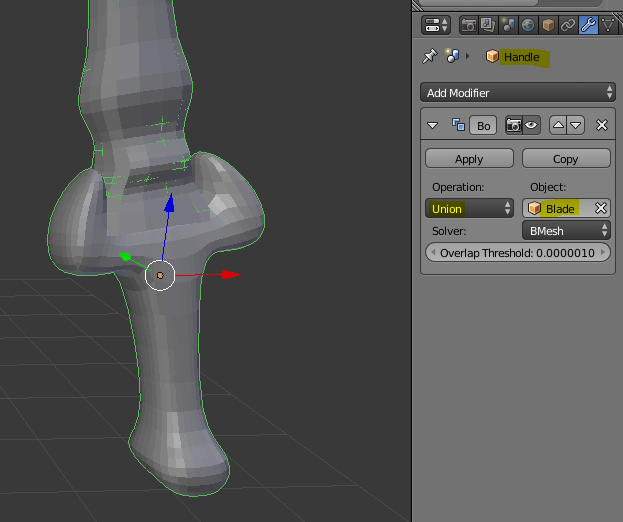
The solution is actually a lot simpler then I thought - Blender has the boolean modifiers to come to the rescue, and this is how it works.
 |
| Add the Boolean modifier to the handle |
 |
| Operation is set to Union, the object in this case is the blade we want to merge. |
 |
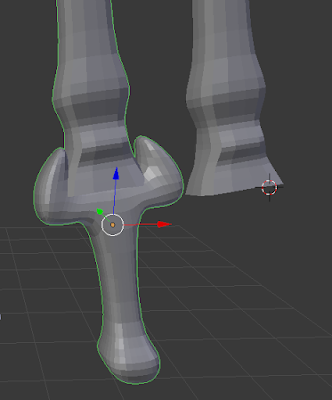
| Once applied, the blade is copied and merged in to the handle, and the original blade needs to be deleted. |
 |
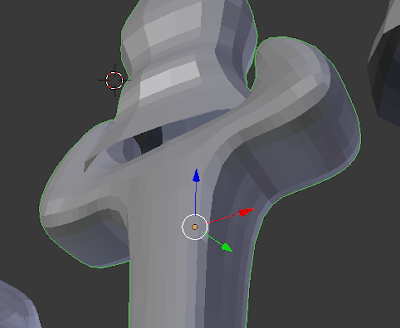
| Warning, this will only work if the edges are intersecting. In this case, the meshes were merged, but there is still a non-manifold edge. |
Additionally, as you merge more and more meshes in to one (this has to be done one at a time), you'll find that some meshes / polys become inverted, but once everything is merged, we can hit ctrl+n to re-orient everything...aka re-calculate the normals.
Anyway, that's what I've worked out for myself - I will attempt this later tonight and be back with the results!
Update: I came across
this forum post which has a large amount of scripts / solutions for merging multiple objects.


