Monday 30 January 2017

Hot off the press - Barbarian, updated Dwarf teasers and collaboration details.

Spent a good few hours on Sunday modelling the Barbarian and I am extremely pleased with the results. Unfortunately, as soon as I went to print him I ran in to trouble with the printer - for the life of me, I just could not get the first layer to stick. Eventually, after settings a larger brim size (8mm) and pulling out a bunch of garbage, I got him to start, but the bottom of the base was ruined. I thought the nozzle might be clogged but that wasn't the case. It turns out that the bed was completely out of level. Most likely this is caused by my grabbing hold of it while trying to get my scrapper underneath the piece to release it. In either case, after fixing that issue he came out beautifully.


I also managed to squeeze in a bit of time to work on the Dwarf. As it turns out, my first player character was so far off the mark, I'm surprised I couldn't see it myself. 


I've certainly learned an incredible amount over the course of this weekend; I'm really impressed with the quality of the models and the print quality. There is a lot more to go though, especially when it comes to exaggerating proportions in order to achieve a more detailed print. When I first started using blender, It was very difficult to get a sense of the scale, I cannot express enough how helpful having Pem's 3D scans has been. Without a doubt it has accelerated my progress significantly, since having a rough guide / template for the miniature's anatomy (at the right scale!) is amazing.

Colaboration Details
Pem has expressed that he is already quite happy with the miniature models he's using, and that he would prefer to concentrate our efforts on the furniture. Now, regarding authenticity, he would also like that the cardboard pieces be modelled, which would require additional work from me (albeit small) since I planned on actually modelling everything in detail, using some of that famous artistic freedom I'm not entirely known for. I'd rather have a detailed piece then a plastic box in the shape of a  card board cut out. Additionally, I'm not really in this for the nostalgia, since I've never actually played the game. At the very least , this gives me the opportunity to get back in to UV mapping and texturing, this way I could provide him with the complete package. So, expect some furniture in the near future as well.

Saturday 28 January 2017

Hot off the press - Elf

Elf is off the printer - here are the shots with and without support structures. Still quite a bit of stringing between supports, even though I did set additional extruder retraction. Oh well, we'll keep trying to home it in - Print temp was mistakenly set to 210 for the first half.

Also, the blade of the sword didn't properly print / was too small. I had to use super glue to stiffen it up. I've already adjusted the model in blender to have a thicker width and I removed all of the subdivions from it too.


Pem & Elf

Pem
In between waiting for the printer and studying up on blender / 3D printing, I did quite a bit of research on HeroQuest as well. I knew I needed reference images, so I scowered the net and, surpsingly, found very little in terms of high-resolution images of each of the figurines. Even on free 3D resource sites like Thingiverse and Shapeways I found very little for HeroQuest. I eventually came across a site this site however: Pem's Code Blog. Pem has been working on Unreal Engine 4 version of HeroQuest, and it just so happened that he owns a copy of the board game. As I later found out, he had actually 3D scanned the pieces for his game. Although the models were not very detailed, I knew that having access to those files would be invaluable. So, with a bit of googling, I was able to reach out to him and we have now decided to collaborate; in exchange for his 3D scan files, I will be supplying him with updated 3D models for his game - in fact he's already tried out the dwarf I sent him and it looks great!

On that note, we also decided that miniature accuracy is important, and that I will avoid deviating too much from the originals. This is fine, since having access to the 3D scans key for scaling and proportions. So, with that said, I will be updating the Dwarf by adjusting the epaulets, modeling the proper helmet and embellishing the axes handle.

Dwarf in video game

Dwarf in video game

Elf Update
I finished modeling the Elf today and it's printing now. I've decided to switch back to square bases as this is what the original figurines were using.
Front

Back


Right

Left

Friday 27 January 2017

Print quality 0.2mm vs 0.1mm

I've just spent the last few hours printing the Dwarf miniature and tweaking the print settings and 3D model.

Print Settings for all prints
Extruder Temperature: 200c
Bed Temperature: 60c
Infill: 10%
Support Fill Amount: 15%
Adhesion type: Brim

Skelleton
Yesterday I modeled and printed the skeleton miniature. For a first try, I was pretty impressed, but the scaling was a lot more difficult then I had original thought. In this case, he was too thin and small. In comparison to the original miniature, the only resemblance would be the pose, and even then it is not entirely accurate - granted, the references I found for this piece were not excellent.

First print
  • Layer height 0.1mm
  • Came out too small
  • Had to print the sythe separately


Dwarf 
I chose this particular piece to attempt first because the anatomy is not nearly as difficult as that of a normal humans, and also is considerably smaller, so less material to work with. All in all, I was very pleased with the resulsts.

First print
  • Layer height 0.1mm
  • Came out too small
  • Issues slicing beard and axe handle.
  • Layer height was great, but took about 40 minutes to print.


Second Print

  • Layer height increased 0.2mm
  • Enlarged the model
  • Tweaked the base
  • Tweaked the beard
  • Added belt buckle and satchel

Third Print


  • Layer height reduced back to 0.1mm
  • Tweaked axe handle.

2nd print (left) , 3rd print (right)

Observations
The increased layer height really helped produce a much faster print, but the quality suffered significantly. I'd be tempted to try a 0.2mm layer height at a slower print speed though, as counter-intuitive as that seems. The 0.1mm layer height produced a much smoother miniature with sharper lines / details, with one draw back: significantly more stringing between the support structures and the piece.

Now, there are two settings I've been tweaking to reduce stringing, retraction and heat. Retraction is when the printer literally retracts the filament back in to itself (i've configured a retraction distance of 5mm and a speed of 100mm) when the printer head is moving from one point to another and not needing to print. In either case, I'm satisfied with the 3rd print, it will simply require a bit more work sanding, but will try to adjust these settings for the next miniature: printing at 195c and 10mm retraction distance.

Example of the stringing


The Skeleton and the Dwarf

So I've officially started work on the. The skeleton was done very quickly to determine how precise I needed to be with the 3D mode; the Dwarf is a keeper (took aproximately 5 1/2 hours to model). I'll be working on the player pieces for the weekend and should be back with another update by Sunday night.


Wednesday 25 January 2017

First prints and a slicer evaluation

We're back in business - but not without a few bumps in the road. The original shipment from Monoprice was lost in the mail by Canada Post; Monoprice was gracious enough to send me another while an investigation takes place.

Thanks to a very friendly user on reddit, I now have a large dump of over 300+ miniature models, mainly for D&D and the likes, which I'm really pleased to have.

On to the printer - I manage to clog the nozzle within the first 15 minutes of use. I did this while trying to raise the Z-Axis of the print head while unintentionally selecting the extrude filament option instead. This caused the nozzle to (attempt) to extrude filament, but since it was so close to the build plate (hence my original reason for wanting to raise it) that all of the hot filament stayed inside. Fortunately, I had done enough research to know that one of the best ways to clear such a clog is with the "Atomic Method".

Atomic Pull

  1. Pull out the bowden tube leading in to the hotend heatsink.
  2. Pre-heat the extruder to ~230 degrees celcius
  3. Pull out the filament
  4. With a smaller piece of filament (~6 inches), push down into the hothead until filament squeezes out
  5. Turn off the machine and let the piece of filament cool down
  6. Once completely cooled, power on the printer, and pre-head the extruder to ~230 degrees celcius once more
  7. While the extruder is heating up, pull on the piece of filament you've inserted, it will eventually come loose, pulling with it all of the clogged up filament.

Printing
Prior to clogging the nozzle, I actually spent a good 20 minutes leveling the bed. Note to self: power on the printer when leveling! I forget if the instructions state to do this but my goodness the time i wasted.  After unclogging the nozzle, I printed the cat.gcode that came on the microSD card - it went extremely well.


GCode is the language which is used by cnc machines, and is also what is generated by the slicing application. In a nutshell, a 3D model (.STL, .OBJ) is 'sliced' in to many many layers, one meant to go on top of the others. For each of those layers, a set of instructions is generated (in gcode) which instructs the printhead to move from point a, to b, to c, etc.

Slicing the STL
As it turns out, not all slicers are made equal. I watched several videos comparing some of the more popular slicers, such as Cura, Slic3r, Craftware (Free / OpenSource), and Simplify3D (costs $150.00). It turns out that each of these excels in certain areas, and I thought it would be best if I did my own comparisons too.

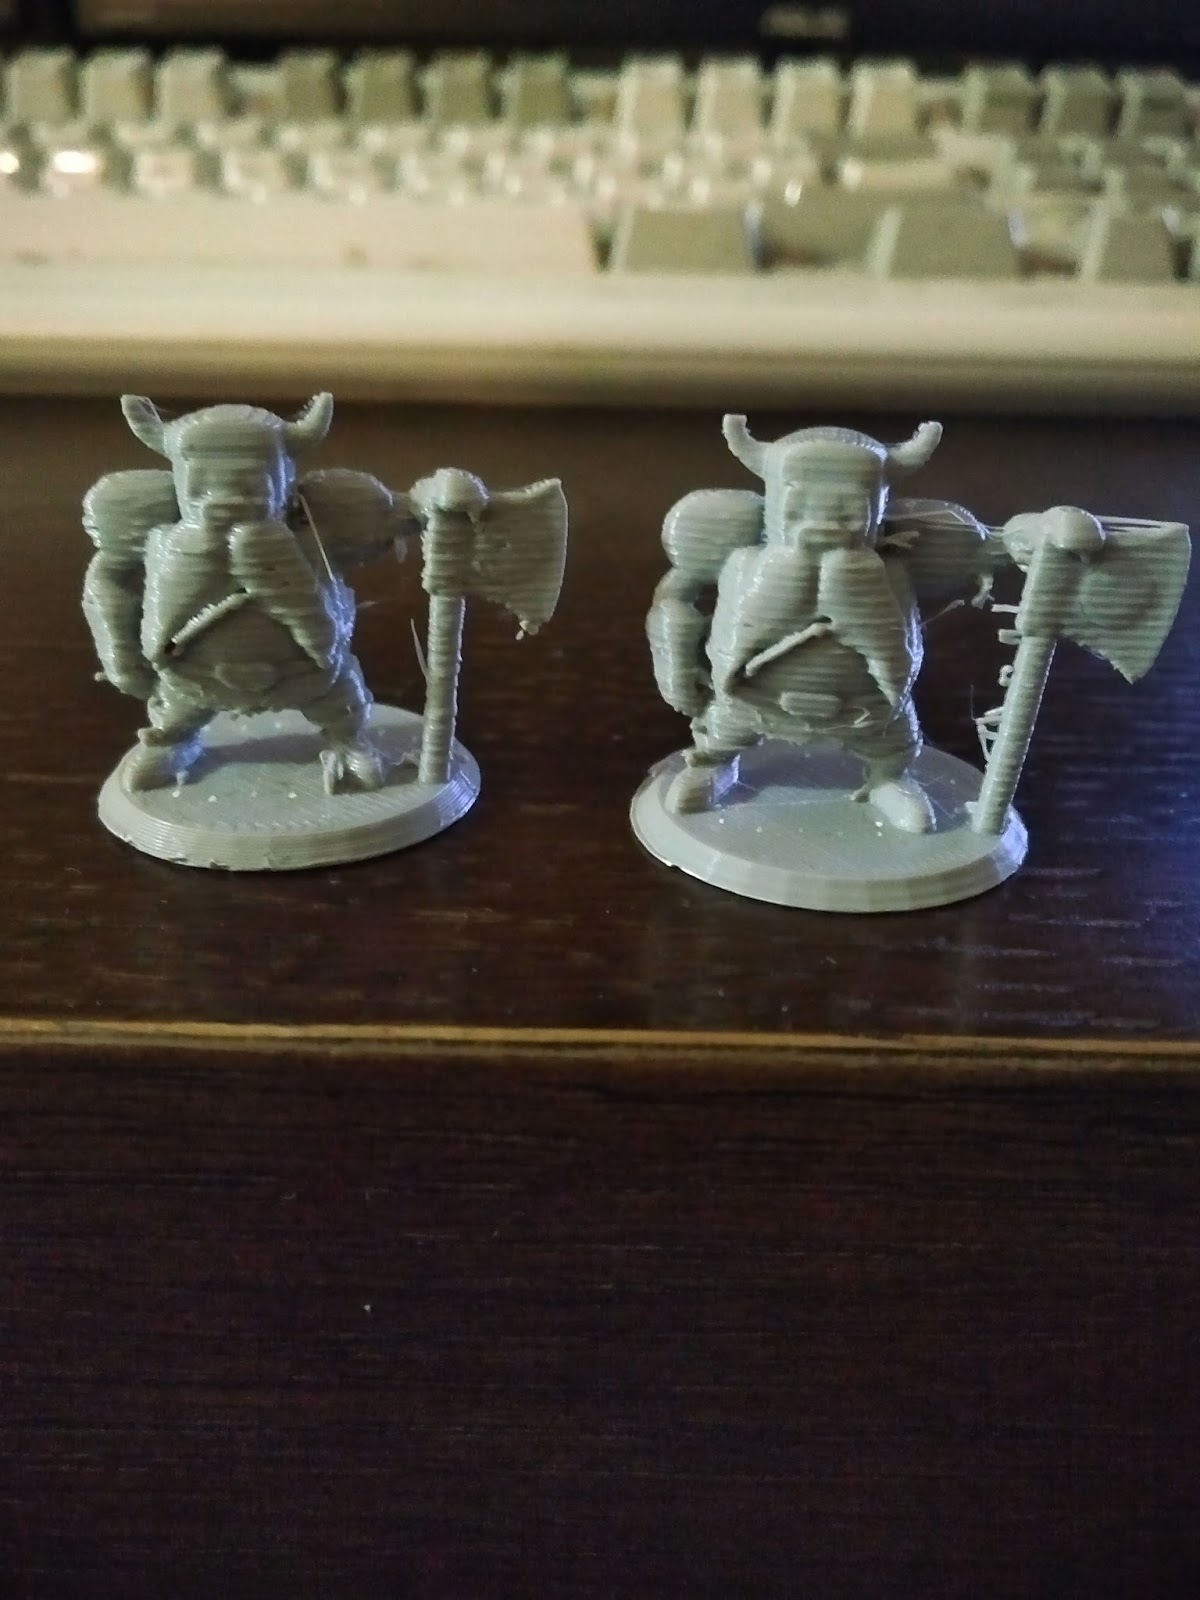
So I printed a small miniature from my collection using Slic3r and knew immediately that, although the results were pretty good, they could definitely be improved. The support structures (material intended to support overhangs) was rather hard to remove, which it shouldn't be. So I tried Cura and what a world of difference that made. The support structures were significantly more user friendly, there wasn't nearly as much of it, and the infil (what is printed inside the model) was a not nearly as dense for this second print. Unfortunately, I was a bit over zealous in changing settings, and should have kept the extruder temperature the same. With slic3r I used 200 degrees celius, and with Cura 210. Now there's no way of telling whether or not some of the imperfections on the Cura print would have been rectified with a lower temperature.

In either case, I'm extremely pleased with the 0.1mm layer height and the model (albeit a bit rough) turned out great. A little bit of sanding and priming and we're laughing...

Oh yea, and it took about 1 hour and 20 minutes to print. Should try experimenting with 0.2mm layer height to see if the drop in quality is worth the increase in speed.
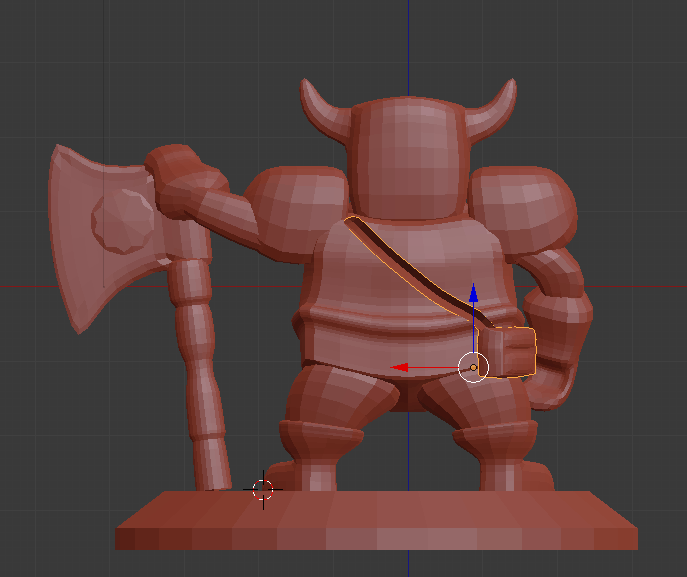

Cura Front
Cura Back


Sunday 15 January 2017

Molding and Casting

Once I get started, I believe molding and casting will become necessary in order to mass produce the parts required for the games I want to play in a timely fashion. Based on some of the preliminary research I've done, here is a list of materials I would require:


  • Two part silicone: Mold Max 20
  • Mold release: Ease Release 200
  • Urethane Casting Resin: Smooth Cast 300
  • Primer: Dupli-Color general purpose sandable scratch filler & primer
  • Putty: Bondo Glazing and Spot Putty
  • Cold Casting: Iron Powder

I've already sourced out a supplier in Toronto which, so far, appears to have everything I'm looking for. I've also found a fanstic prop making youtube channel which will no doubt be an invaluable resource: Punished Props

Sunday 8 January 2017

Learning Blender

Started working with Blender today and made some pretty significant progress; it certainly helps that I have 3D modeled in the past. I manage to find a pretty incredible tutorial on YouTube and have been plowing through it. All this in the hopes of familiarizing myself enough with the program that I might be able to start modeling my own miniatures in as little as a week or two.

On a side note, I've decided against 3D printing the game board. For starters, it'll give leave me with a lot more time to print actual game pieces, such as monsters, players, furniture etc, i'll have a working game sooner, as well as I actually modeled a rough board and encountered a fatal design flaw which would require a lot more designing and I wasn't particularly eager to commit so early on in the project.


I should have another update on Blender in a few days - my next post will most likely be about molding / casting, as I'd like to have a reference to some of the materials required and sources I've come accross.

High and low poly progress:

Friday 6 January 2017

OpenQuest

The obsession I had which led to the relatively rash decision to purchase a 3D printer came when I recently stumbled upon a board game named HeroQuest while watching YouTube videos one evening. This Dungeons & Dragons style board game from 1989 pits the players (up to four of them) against the Game Master (an evil wizard named "Zargon", also played by one of the players), whom sets our Heroes out on quests to gather treasure and defeat his wicked minions.

Looking for copies of the game on Amazon.ca and Ebay however, left a lot to be desired. My heart sank as i realized an incomplete game is selling for $300.00 - $400.00, and $1950.00 for a complete set respectively. So with these two options out of the picture, I turned to 3D printing as an alternative to paper, which personally would just feel cheap.

While waiting for the printer to arrive, I've already started immersing myself heavily in the research required to fulfill the project needs, which including 3D printing, modeling, mold making and casting. Given the total number of game pieces required (71), as well as the speed of printing (a miniature could take anywhere from 30 minutes to 2 hours), it would be much more efficient to create master molds of the 3D models I design and print and cast these using resin, which cures in roughly 10 to 20 minutes.

I should have a few images to share in the coming days - at the moment, i'm debating on whether or not to 3D print the board. Given that the size of my printer's print bed is only 4.7" x 4.7", I would need to print roughly 20 pieces to complete it...

Thursday 5 January 2017

Monoprice Select Mini officially ordered.

Took the plunge and ordered myself the Monoprice Select Mini from amazon.ca yesterday along side a spool of 1.75mm grey PLA filament. This comes after having watched and read approximately 18 hours of YouTube videos and blogs on 3D printing as a whole, as well as the pros and cons of DIY versus pre-assembled printers. Reviews were extremely positive for this relatively low priced model, costing approximately $345.00 CAD after all was said and done.

One indispensable resource so far has been the MP Select Mini Owners subreddit, which is surprisingly active. I was able to find the answer to several questions I had, from swapping heatends and nozzles, to printer upgrades and modding.

While waiting, I plan on brushing up on my box modelling skills using Blender, as well as putting together a list of parts I'd like to immediately print in order to improve printing results. Note to self...look through your spare parts for a 40mm fan to either add to or replace the one coming with the MP Select Mini. As it turns out, it is imperative to have efficient cooling for prints to come out well.