Thursday 23 February 2017

Hot off the press - Zombie, and second Gargoyle attempt.


Finished modeling the Zombie on Monday, as well as re-printed the Gargoyle with additional top layers to fix the holes in the base. I also printed the wings vertically this time, and they came out great.

I realised that I never really followed up with my post on repairing models (I've been using a new technique, not the boolean method) so I will be posting something shortly on this.


Saturday 18 February 2017

Hot off the press - Gargoyle

As promised, here is the first Gargoyle print. All in all, I'm extremely satisfied with the results, except for a small mistake (partially my fault) where the feet and base meet. I was very worried about the amount of support needed for this larger print and went a little overboard (I don't have a picture of this as I was too eager to get it wrapped up), especially for the whip, which is entirely suspended. I was even more worried / careful removing the supports, and it looks great. I did end up printing the wings separately, I used a raft to get this down and printed it horizontally - not sure what happened because their finish came out horribly, so I'll try printing them vertically instead.

I will say though that the wings fit perfectly. Very happy with the two part print.


Hole in th base. I will increase top layer heights to try and fix this...


Wings front

Wings back (very bad finish)

Front - no wings

Back - no wings

Front

Back

What's the hold up?

I'm back with the official furniture shots, and will also be unveiling the Chaos Warrior and Chaos Warlock that I finished last weekend. The time I spent modeling this week was on the Gargoyle, which, although being one of the least accurate pieces to date, I'm quite happy with so far; he's actually printing at the moment, so expect to see a follow up to this article fairly soon. I'll also include a couple of teasers with the 3D model shots...

Torture Rack

Torture Rack

Sorcerer's Table


Weapon Rack

Alchemist's Bench

Tomb

Tomb

Fireplace

Treasure Chest

Treasure Chest

Treasure Chest

Throne

Throne

Throne

Booksheld / Cupboard topper

Table


Table

Chaos Warrior Front


Chaos Warrior Back

Chaos Warlock Front

Chaos Warlock Back

And the Gargoyle model:


Thursday 9 February 2017

Operation furniture

After a hectic 5 days I'm glad to be back with an official progress report. I took February 6th to the 8th off of work to try and get as much done as possible and boy did I ever. Given that it needed to be done, and to satisfy Pem with additional material for his game, I decided to focus all of my attention entirely of finishing the furniture. So, with this in mind I'm glad to be sharing the following.

Note: I have to give credit where credit is due and I didn't personally the HeroQuest chest, and this I found on thingiverse here

Completed

  • Door stand
  • Treasure chest
  • Treasure chest cardboard
  • Throne
  • Throne cardboard
  • Table
  • Table cardboard 
  • Torture rack
  • Tomb
  • Bookshelf cupboard
  • Alchemists bench
  • Sorcerer's table
  • Fireplace
  • Weapon rack
Pending

  • Open door cardboard
  • Closed door cardboard
  • Alchemists bench Cardboard
  • Bookshelf cupboard Cardboard
  • Sorcerer's table Carboard
  • Fireplace cardboard
  • Tomb cardboard
  • Torture rack cardboard


Weapon rack, Alchemist's Bench, Sorcerer's Table, Torture Rack, Tomb, Fireplace, Bookshelf Topper

Chaos Warrior, Throne, Door holder.

Friday 3 February 2017

And then there were 4

I've got a lot to discuss in my next post, for now I'm going to leave you with this teaser...


Wednesday 1 February 2017

Simplify3D - 3D modeling for 3D printing

Little did I know
Since remodelling the Dwarf, I've spent the last 2 days tweaking my slicer and print settings to get him to print accurately, but to no avail. Not only am I finding Cura 2.3's support structure somewhat difficult to remove, it is often placing supports where they are not needed, causing the entire model to look rather rough. In the mean time, I've also been experimenting with new layer heights, based on an article detailing optimal heights for the Monoprice Select Mini, found here in the wiki.

Don't get me wrong, I'm very pleased with the results so far, but something just didn't seem right; the more I learn about 3D printing, the better quality I'm beginning to expect.

So, with all the trouble I was having, I decided to take the plunge and spend an additional (very steep price of) $150.00 USD on Simplify3D (S3D), one of the most talked about slicers in the industry. Thankfully, if i'm not entirely satisfied within two weeks, I will be pleased to accept a full refund.

First I will say, the supports that are generated are (although not always entirely accurate), absolutely stunning and easily removable - you also have the ability to add your own supports, and remove those that you don't require, which is incredible. Scaling my object on the other hand turned out to be a pain, having to miniaturize the actual blender file prior to exporting it to STL - and even after all that was said and done, my print still had issues! But not just a little bit of stringing and looking rough, the model was left with entire sections missing, holes where there shouldn't be et cetera...

So, I did some additional research and what I discovered was almost too much for me to handle..

Modeling for 3D printing

Oh yes, I've been doing it all wrong! I figured there would be certain ways to optimise meshes for 3D printing, but it turns out that having multiple objects / meshes in blender and to export these as one STL with multiple intersections is not the proper way to do this; sure this might work for gaming or rendering. If that is the case, the slicer is constantly fighting with the edges, cutting and having to heal non-manifold edges (holes in the model), which makes for relatively poor resulting gcode which is often times way more complex than it needs to be.

Note: Ctrl+Shift+Alt+M in edit mode of blender displays all non-manifold edges of a mesh.

But why wasn't this an issue before? Wouldn't this imply that Slic3r and Cura are doing a much better job slicing these models than S3D? Are the wicked supports really worth $150.00 USD of my hard earned Canadian moola? Well, yes and no. From what I gather, the gcode that is generated by S3D is incredibly efficient and puts out very smooth and beautifully finished pieces, when it works. I suspect that both Slic3r and Cura are cheating, skipping entire sections of mesh, and only sometimes leaving small gaps (which I've noticed in the past but attributed to poor plastic extrusion). So, with this in mind, I've set out on fixing the 3 models I've created so far to create a single seamless Mesh.

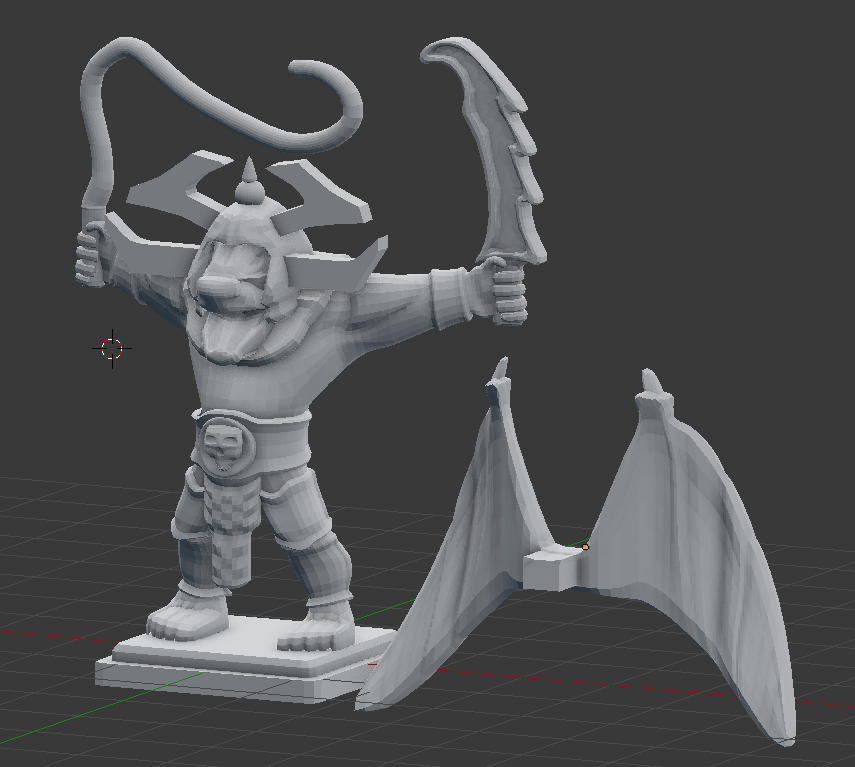
The single, seamless Mesh
So, how is this done? Manually of course, by joining multiple objects together and adding / merging vertices at the edge of each of the pieces...but not only would that be tedious, it would actually be impractical, and nearly impossible for the following reason:  the number of subdivisions in each of the parts is extremely high to produce a very smooth surface - so having to create faces between each of the edges, for every single object (not mesh in this case) could take up to tens of hours per finished model.

The solution is actually a lot simpler then I thought - Blender has the boolean modifiers to come to the rescue, and this is how it works.

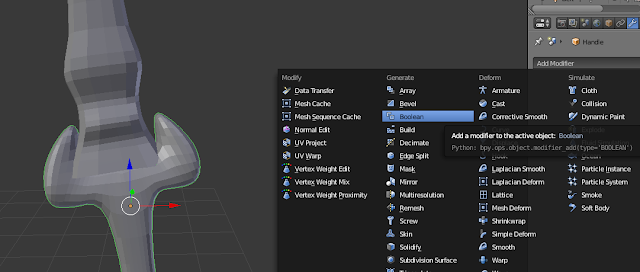
Add the Boolean modifier to the handle

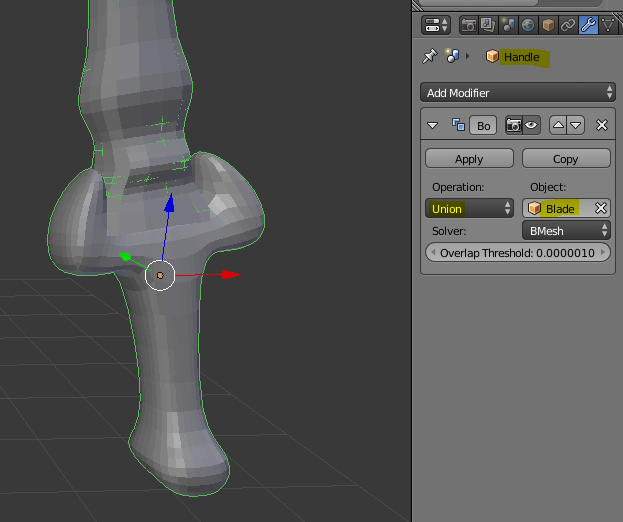
Operation is set to Union, the object in this case is the blade we want to merge.

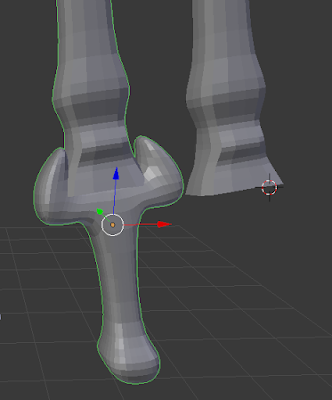
Once applied, the blade is copied and merged in to the handle, and the original blade needs to be deleted.

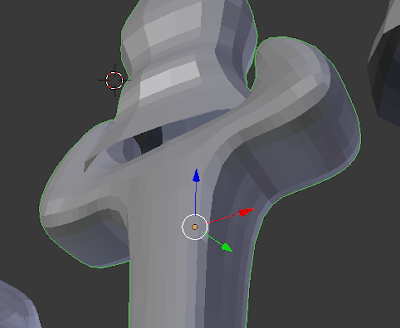
Warning, this will only work if the edges are intersecting. In this case, the meshes were merged, but there is still a non-manifold edge.


Additionally, as you merge more and more meshes in to one (this has to be done one at a time), you'll find that some meshes / polys become inverted, but once everything is merged, we can hit ctrl+n to re-orient everything...aka re-calculate the normals.

Anyway, that's what I've worked out for myself - I will attempt this later tonight and be back with the results!

Update: I came across this forum post which has a large amount of scripts / solutions for merging multiple objects.

Monday 30 January 2017

Hot off the press - Barbarian, updated Dwarf teasers and collaboration details.

Spent a good few hours on Sunday modelling the Barbarian and I am extremely pleased with the results. Unfortunately, as soon as I went to print him I ran in to trouble with the printer - for the life of me, I just could not get the first layer to stick. Eventually, after settings a larger brim size (8mm) and pulling out a bunch of garbage, I got him to start, but the bottom of the base was ruined. I thought the nozzle might be clogged but that wasn't the case. It turns out that the bed was completely out of level. Most likely this is caused by my grabbing hold of it while trying to get my scrapper underneath the piece to release it. In either case, after fixing that issue he came out beautifully.


I also managed to squeeze in a bit of time to work on the Dwarf. As it turns out, my first player character was so far off the mark, I'm surprised I couldn't see it myself. 


I've certainly learned an incredible amount over the course of this weekend; I'm really impressed with the quality of the models and the print quality. There is a lot more to go though, especially when it comes to exaggerating proportions in order to achieve a more detailed print. When I first started using blender, It was very difficult to get a sense of the scale, I cannot express enough how helpful having Pem's 3D scans has been. Without a doubt it has accelerated my progress significantly, since having a rough guide / template for the miniature's anatomy (at the right scale!) is amazing.

Colaboration Details
Pem has expressed that he is already quite happy with the miniature models he's using, and that he would prefer to concentrate our efforts on the furniture. Now, regarding authenticity, he would also like that the cardboard pieces be modelled, which would require additional work from me (albeit small) since I planned on actually modelling everything in detail, using some of that famous artistic freedom I'm not entirely known for. I'd rather have a detailed piece then a plastic box in the shape of a  card board cut out. Additionally, I'm not really in this for the nostalgia, since I've never actually played the game. At the very least , this gives me the opportunity to get back in to UV mapping and texturing, this way I could provide him with the complete package. So, expect some furniture in the near future as well.